Learning together challenge: Alpine.js and Fake API (first time use)
You probably know better

Good day, fellow reader.
My name is Marcelo Zarate and on my first post I stated that one of the reasons I've started this blog is to learn. So today, instead of the classic blog entry with very neat and detailed explanations of what to do here, and there, we are going to learn together. Or, if you already know the subject, you are going to watch and enjoy the experiment. I'm going to try learning Alpine.js alongside you. I have some experience with frontend frameworks, some good memories with jQuery. After reading state of Js 2021 I've decided to give Alpine a go, at least for small projects.

The mission
Let's build a simple app just by using
- Alpine.js
- JSON Placeholder Fake API
The conditions
I've never used any of the above. If you also haven't, then this post is probably be more interesting for you. Conditions actually are:
- No cheating. I will start from Alpine.js documentation, and try to work it out from there.
- No googling. Or at least, being honest if I get stuck and I need to search something.
Let's start
Introduction
Ok, first we go to Alpine.js homepage and the first screen is an example of usage
<script src="//unpkg.com/alpinejs" defer></script>

<div x-data="{ open: false }">
    <button @click="open = true">Expand</button>

    <span x-show="open">
      Content...
    </span>
</div>
We just try it out locally, and it works!

So, deducting from the example it seems that x-show attachs some visibility attribute to the block. x-data defines the (data/model?) and @click really looks like Vue v-on, triggering the assignment open = true when the button is clicked.
Fetching data
Ok, from the homepage example, we are going to preserve only the "importing"
<script src="//unpkg.com/alpinejs" defer></script>
We need to fetch the data from the Fake API, following its guide
I found this service after reading Roger Camargo's blog article 3 ways to mock an API in JAvascript. Great article if you have any interest in that topic!
fetch('https://jsonplaceholder.typicode.com/posts')
  .then((response) => response.json())
  .then((json) => console.log(json));
So, it seems that our main div is going to be
<div x-data="{ users: [] }"
    x-init="fetch('https://jsonplaceholder.typicode.com/users')
    .then(response => response.json())
    .then(data => users = data)">
</div>
Now, since we are populating x-data with the information from the fetch, and users is an array, we need a frontend sintax to loop through that array, looking down in alpine documentation we can find the x-for directive that states "Repeat a block of HTML based on a data set". Fits perfectly.
<template x-for="user in users">
    <h2 x-text="user.name"></h2>
    <span x-text="user.username"></span> - <span x-text="user.email"></span>
</template>

Seems to kinda work? I suspect something here, but we better go to the x-for documenation (remember, I've never used Alpine)
Documentation says:
There are two rules worth noting about x-for:
- x-for MUST be declared on a element
- That element MUST have only one root element
Ok, so confirmed, we need to wrap our tags with one root element. I'll be using a div tag, should be something more meaningful, I don't know if the fragment concept from React is available in Alpine, but let's keep it simple for now:
<template x-for="user in users">
    <div>
        <h2 x-text="user.name"></h2>
        <span x-text="user.username"></span> - <span x-text="user.email"></span>
    </div>
</template>
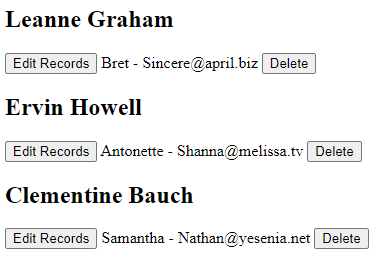
And the result:

Deleting
Ok, so what if we want to delete one user? Fake API allow us to simulate a delete request, quoting the guide
fetch('https://jsonplaceholder.typicode.com/posts/1', {
  method: 'DELETE',
});
Then we might need to add a button like this
<button x-on:click="fetch('https://jsonplaceholder.typicode.com/users/'+user.id, {
    method: 'DELETE',
});">
    Delete user
</button>
Editing
Well, instead of editing in another page, we want to actually toggle editing in the same page, so we probably need something to hide or display inputs. Quickly scrapping we can see x-show and x-if there, they don't look too much different so we are going with the first one that doesn't use the template tag.
<div x-show="open">
  ...
</div>
And we will need to populate and probably sync the data, seems that x-model is going to serve us well.
<div x-data="{ search: '' }">
  <input type="text" x-model="search">

  Searching for: <span x-text="search"></span>
</div>
So we are thinking of something like (we will allow to edit only the name for now, we could just extend the behaviour for other parameters)
<div x-show="editUser">
    <input type="text" x-model="user.name">
</div>
And declaring the boolean editUser in x-data. But that variable is going to be shared with all users, so, if I program a button to edit some user, all the users are going to show their edit inputs (I tried at first, but didn't liked it). So, we are going to need a way to identify in the frontend WHICH user are we currently editing.
We will change the initial x-data
<!-- BEFORE -->
<div x-data="{ users: [] }" ...>
<!-- AFTER -->
<div x-data="{ users: [], editingUser: 0}" ...>
and we will set editingUser with the id of the current user to edit.
<button x-on:click="editingUser = user.id;">Edit Records</button>
Now, in the x-show, if the user.id matches the editingUser, show the edit box
<div x-show="user.id === editingUser">
    <input type="text" x-model="user.name">
</div>
Now, inside that block, we will also need some buttons to actually save the edit, and another one to cancel the edition
<button x-on:click="console.log('saving user: '+user.id);">Save</button><button x-on:click="editingUser = null;">Cancel</button>
purists will come after us for that editingUser = null
Now, an extra, hitting on cancel would be nice to make the value as the original one, but since x-model syncs the input with the actual value, we will need to store the original name in case the user hits cancel and wants it back
So our div becomes
<div x-data="{ users: [], editingUser: 0, originalName: ''}" ...>
And the cancel button
<button x-on:click="editingUser = null; user.name = originalName;">Cancel</button>
Updating
Here, we have two options, to send a PUT request or PATCH request. We are going with the latter
According to the guide on JSON Placeholder:
fetch('https://jsonplaceholder.typicode.com/posts/1', {
  method: 'PATCH',
  body: JSON.stringify({
    title: 'foo',
  }),
  headers: {
    'Content-type': 'application/json; charset=UTF-8',
  },
})
  .then((response) => response.json())
  .then((json) => console.log(json));
Now our "save" button on editing changes from this
<button x-on:click="console.log('saving user: '+user.id);">Save</button><button x-on:click="editingUser = null;">Cancel</button>
to this:
<button x-on:click="fetch('https://jsonplaceholder.typicode.com/posts/1', {
    method: 'PATCH',
    body: JSON.stringify({
      name: 'Test',
    }),
    headers: {
      'Content-type': 'application/json; charset=UTF-8',
    },
    })
    .then((response) => response.json())
    .then((json) => console.log(json));">
    Save
</button>
It works, well, kind of. If we inspect the network tab in developer tools we can see that the endpoint is called correctly, but, in the case of creating/updating/deleting, according to the JSON Placeholder guide:
Important: resource will not be really updated on the server but it will be faked as if.
Finishing touches
So well. This is our final "functional" CRUD with Alpine.js and JSON Placeholder.
Looks pretty boring. Let's spend no more than 5 minutes with style touches using Tailwind CSS classes and DaisyUI default themes.

The code
See you around!


